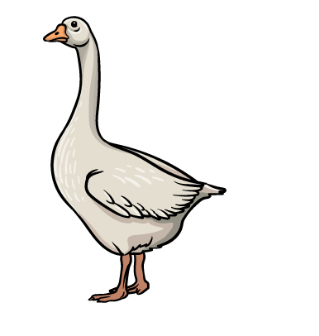
Goose drawing in just 6 สล็อตเว็บตรงแตกง่าย โอกาสสร้างผลกำไรได้ไม่ยาก ทางเข้า สล็อต 789 เว็บตรง ไม่ผ่านเอเย่นต์ เว็บเกมที่ได้รับมาตรฐาน การยอมรับในโลกอินเทอร์เน็ต มีกระแส ว่าเป็นเว็บไซต์เกมได้อัปเดตเกมฮิตประจำสัปดาห์ทุกสัปดาห์ เรียกได้ว่ามีเกมใหม่ๆ เสริมเข้ามาโดยตลอดเลยทีเดียว เว็บใหญ่ปลอดภัย ไม่ว่าจะเล่นผ่านทางไหนๆ สนุกทำเงินได้ง่ายๆ เปิดบริการตลอด 24 ชั่วโมงstraightforward measures! Geese are some of the numerous odd and charming birds to observe. These waterfowl frequently generate misconduct and carry acts against anyone who brings in their practice. You may also learn many things cartoon drawing, scary drawing, flower drawing, easy pencil drawing, cool things to draw, scary drawing, creative drawing, and flower drawing.
Despite their boisterous personality, they are also very attractive birds, so many people enjoy knowing how to draw a goose and recreate it in pieces of craft. Our step-by-step manual on withdrawing a goose in just 6 easy steps will show you to recreate one of these persistent birds.
How to draw a goose – allow contact to form!
Stage 1
In this first phase of our compass on removing a goose, we’ll begin with the head and back of the goose. First, you can use rounded lines to create the goose’s beak. This will be separated into two well-differentiated parts, the upper part being larger than the lower part. You can then connect another round line to the beak for the top of the goose’s head. This line will extend further down to form the long neck and the beginning of the goose’s back. Once you’ve replicated the lines as they appear in our reference image, you’re ready to proceed to step 2!
Step 2: Following, halt the inlet of the goose.
Once the head is completed, you can form, depleting the goose’s channel. You can draw another curved bar from the brim to the base of the waterway. This line will be parallel to the other neckline you drew. Then the lowest bar of the inlet will round out into a big stomach for the goose. This will do it for this step, and you can move on to the next step.
Step 3: Directly remove some pieces of the countenance with more body.
This third step in our how-to draw a goose guide will allow you to add some facial details to the goose while drawing a bit more of the body. First, extend the belly line down and in, but for the bottom of the goose. Then this line will drop sharply towards the outline of the crow’s feet.
Once these portions are removed, you can complete the tail and fill in the line coming down from the tail. Ultimately, for this stage, we will end at the front. Draw a little ebony ring with a stripe low for the gaze. Then, draw another curved line at the bottom of the face where the neck begins for the goose cheek. You can finish the beak by adding another stitch for the goose’s nostril.
Step 4: Subsequently, deplete the crow’s floors.
Your goose drawing is already excellent! In this fourth step, we will adjust some details for the goose. First, finish the legs and add the rest of the outlines. You can then fill in the outline where space has been left near the legs and draw the top of the wing that will go near the top of the goose’s body. With all these lines drawn, we have a few more details to add in the next step before we start coloring your amazing goose drawing.
Step 5: Nowadays, you can satisfy the characteristics of your goose print.
In this fifth part of our guide on drawing a goose, we will focus on finishing the details before coloring the drawing. This stage’s main feature will be completing the wing you started earlier. To draw this, we’ll use many sharp lines connected to create the feathers for the wings.
Then there are just a few minor details to add, but you’re almost done! Before proceeding to the last stage, you can count your facts. These can be minor, like adding more feathers, or more drastic, like drawing a second goose for it to hang out with. These are just a few ideas, so what do you come up with to finish off this image?
Step 6: Finish your goose drawing with color.
This stage’s main feature will be completing the wing you started earlier. To draw this, we’ll use many sharp lines connected to create the feathers for the wings. Then there are just a few minor details to add, but you’re almost done! Before rolling on to the last step, you can add your points. These can be minor, like adding more feathers, or more drastic, like drawing a second goose for it to hang out with. These are just a few ideas, so what do you come up with to finish off this image?